Most PC users don’t know that they can overclock their Monitors just the way they can overclock their CPUs and Graphics Cards for a small performance boost. If you do it the right way, you can boost your monitor’s refresh rate safely without breaking it.
In this article, I’ll show you how to overclock your monitor to higher refresh rates. It is a simple process that can be understood even if you’re not a tech geek.
What is a Monitor's Refresh Rate?
The refresh rate of a monitor is the number of times per second it updates itself with new pictures. The refresh rate is measured in Hertz (Hz).
So, if you have a 60Hz monitor, the monitor updates itself 60 times a second. If you have a 144Hz monitor, the monitor updates itself 144 times a second. This means you’ll be able to see more images in a second when you use a 144Hz display than a 60Hz display.
You will be able to notice the difference in games even when you go from a 60Hz to 75Hz refresh rate. It is a myth that human eyes cannot see beyond 24 FPS. Human eyes will be able to notice small and minute differences as well. I myself couldn’t go back to a 60Hz monitor once I started using a 144Hz monitor.
Learn more about Refresh Rates in detail: 60Hz vs 75Hz vs 144Hz vs 240Hz Monitors Refresh Rates Explained
Pros and Cons of Overclocking your Monitor
By overclocking your monitor, you’ll be able to increase its refresh rate without spending an extra penny. Having a high refresh rate offers smooth movement without any stutters and jitters.
You can eliminate screen tearing in video games if you have a high refresh rate monitor.
Having higher refresh rates is very beneficial to you if you’re into competitive gaming or while playing fast-paced shooing games. It gives the gamer an extra edge over his opponent.
Having a high refresh rate monitor decreases the input lag. Due to less input lag, you will be able to notice enemies and react quickly.
It also decreases motion blur and choppiness thereby providing an immersive and realistic gaming experience.
You’ll notice more visual elements during gameplay on a higher refresh rate monitor due to more screen refreshes.
The downside will be more power consumption. It is nothing enormous but is generally higher than a non-overclocked monitor. You can also reduce the life span if you take it to the extreme. But mostly, the chances are very minimal.
When you overclock any device, there is an inherent risk of damage. It will also probably void your monitor’s warranty. I’m not accountable for the damage of your monitor. Don’t worry. If you follow the instructions in this guide properly, you’ll be able to safely overclock your monitor for higher refresh rates. I’ve overclocked many monitors without damaging them. You can too.
Can I Overclock any Monitor?
Know that all monitors are not made equal. They have different panels, screen types, resolutions, etc. The quality of the hardware used inside the monitors changes from brand to brand even though they may have the same specs on the paper. Some Old monitors using a VGA connector might not even support overclocking. The latest monitors tend to overclock better.
Most importantly, check your panel specs. Many monitors that run at 144Hz use 120Hz panels. Some monitors running at 165Hz use 144Hz panels and few monitors running at 75Hz use 60Hz panels. They are generally overclocked by the manufacturer. It would be harmful to add an overclock on top of an already overclocked monitor.
Also, in some cases, when you try to overclock two monitors of the same brand, model number etc., you may not be able to achieve the same results on both of them.
For example, if you overclock one monitor to 75Hz from 60Hz, the other monitor may only be overclocked to 70Hz. This is not to say that the monitor that achieved a less powerful overclock is a defective one.
In most of the cases, the video scalers used in the monitors restrict the capacity up to which you can overclock. This is to prevent damage. The ability to which you can overclock also depends on the silicon lottery of the hardware used on which you have no control over.
The connectors you use and the resolution of the monitors also come into play. Monitors using display port and dual-link DVI connectors tend to overclock better than those using a single DVI cable or an HDMI cable. Use G-Sync and Free Sync monitors for better gaming experience and reduced stutter and tear.
How to Overclock Your Monitor: Nvidia Guide
Step 1: Right-click on your desktop and click on “NVIDIA Control Panel”.
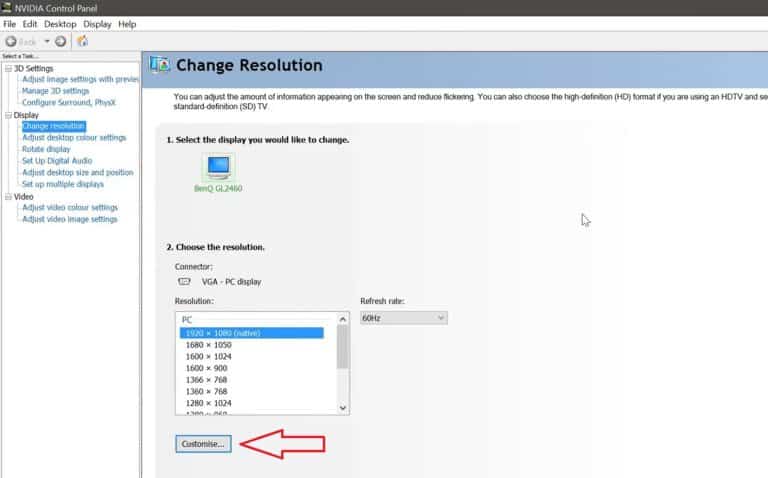
Step 2: Navigate to the “Change Resolution” under the Display and click “Customize…” Button.
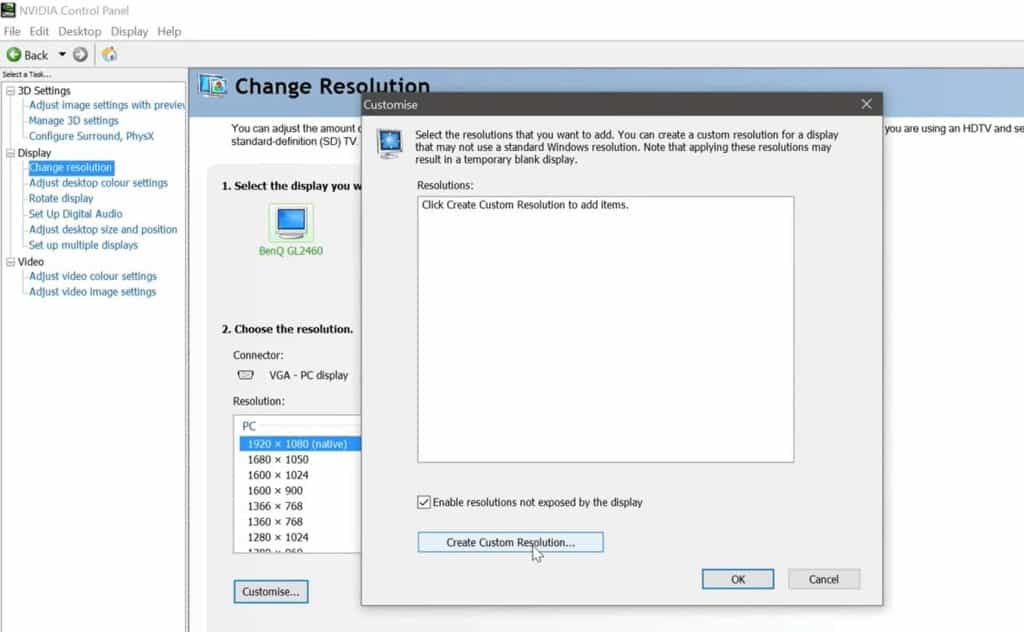
Step 3: Tick the box saying “Enable resolution not exposed by the display” and click “Create custom resolution…”. A window of Nvidia’s Terms and Conditions pops up. Read them and click on “Accept”.
A new window of Create Custom Resolution pops up. This window allows you to create a custom resolution and refresh rate profile on your monitor.
Step 4: In the Refresh rate (Hz) option, try increasing the refresh rate in steps of five. If you have a 60Hz monitor, try increasing it to 65Hz and click on Test. If your monitor supports the overclock, it will ask you if you want to save the custom resolution. Click on “Yes” to save that setting.
If your monitor doesn’t support the overclock, the monitor goes black and reverts to its older refresh rate in 20-30 seconds. This is a part of the process. You have nothing to worry about. The maximum number at which your screen doesn’t blackout is the highest refresh rate you can achieve. This is different for every monitor.
Mine overclocks up to 75Hz
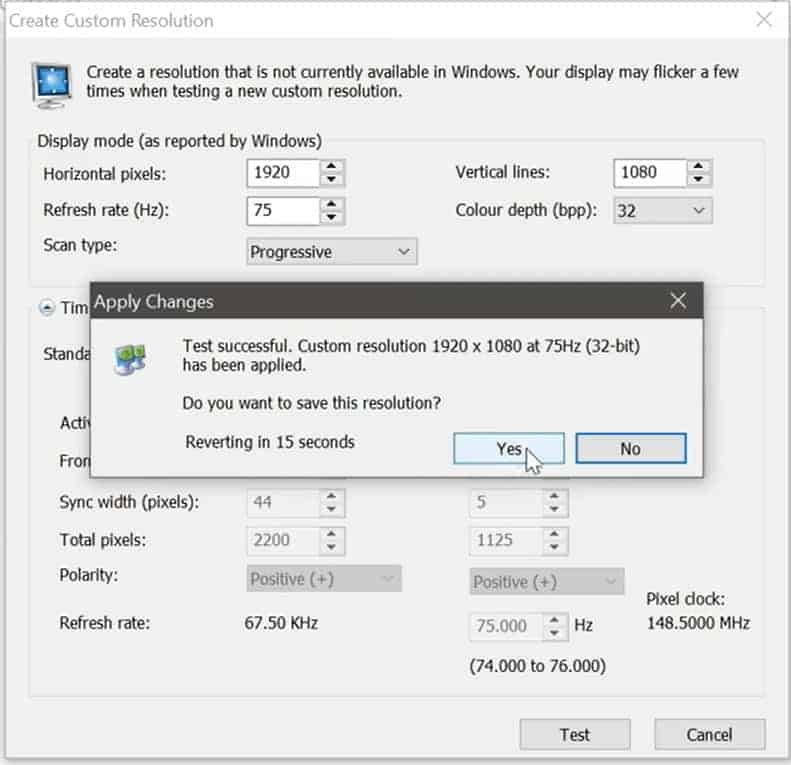
Step 5: In the NVIDIA Control Panel, Select the highest refresh rate that you have created which your monitor supports. Click on Apply and press “Yes” to accept the changes.
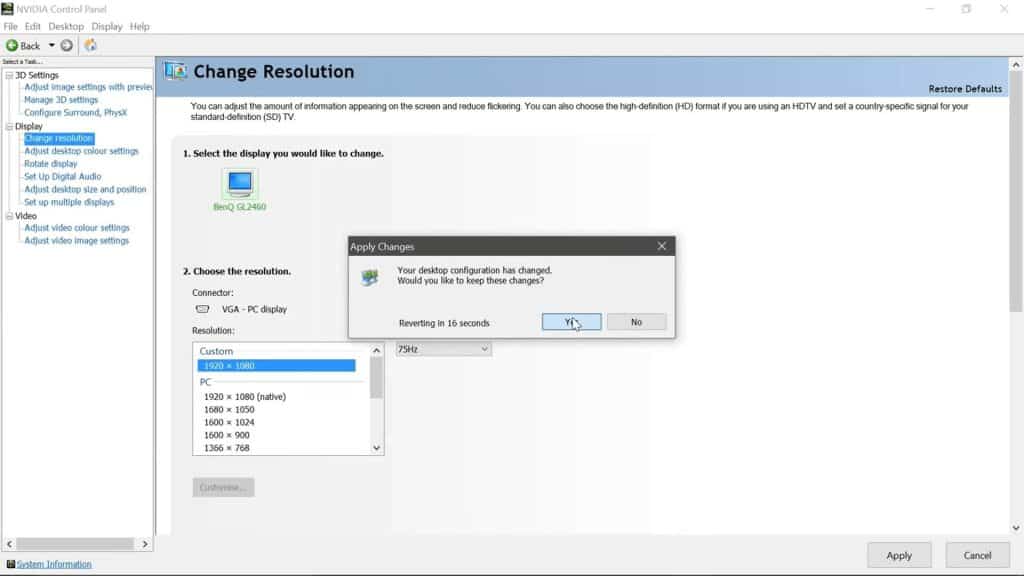
You have successfully overclocked your Monitor using the NVIDIA Control Panel.
How to Overclock Your Monitor: AMD Guide
Step 1: Right-click on the desktop and click on the “AMD Radeon Software” option.
Step 2: Under the Gaming tab, Click on the “Global Display” setting. Under the “Custom Resolution” section, click on “Create New”. Here you will be presented with various display settings to change.
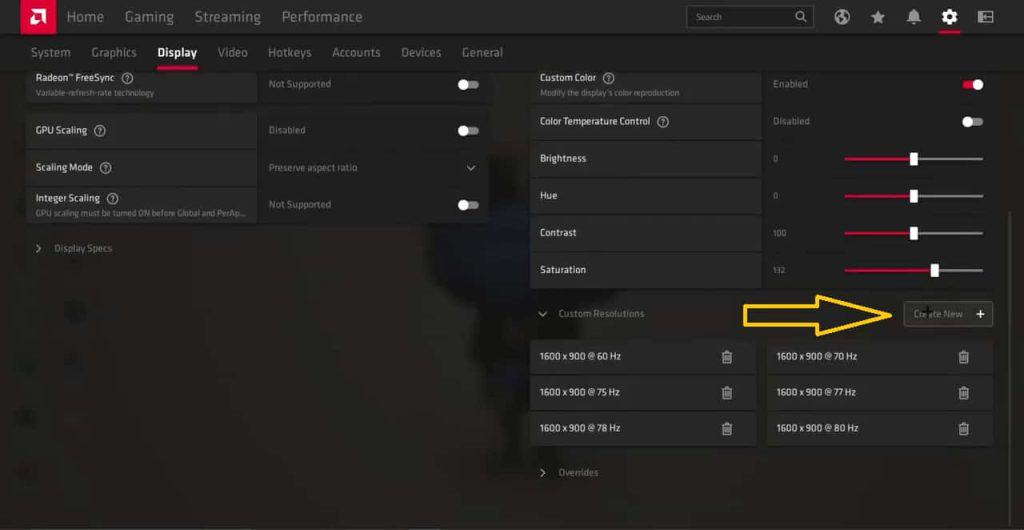
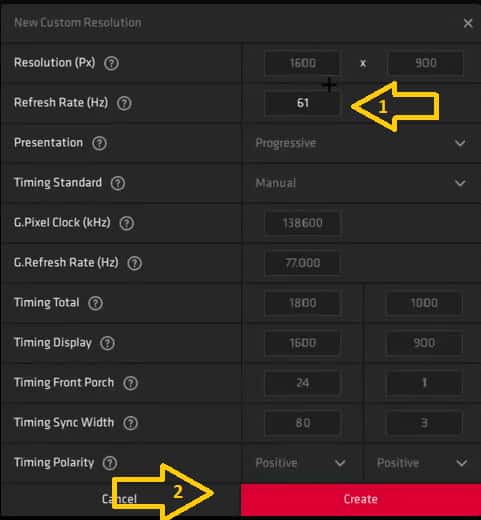
Step 3: You can increment your refresh rate by five units. Now click “Create” to save this new refresh rate. To apply this refresh rate, you need to use the Windows display settings.
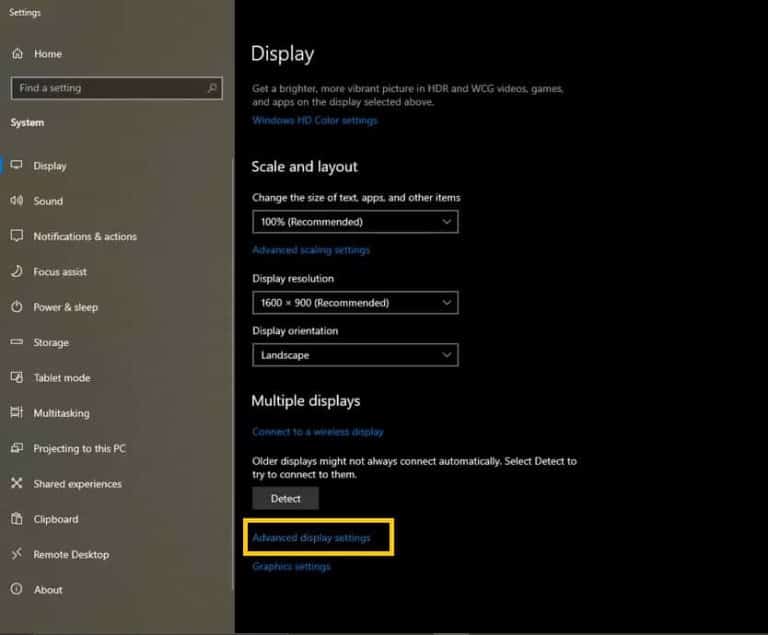
Step 4: Right-click on the desktop and choose “Display settings” option. Click on “Advanced display settings” and click on “Display adapter properties”. A pop-up window appears.
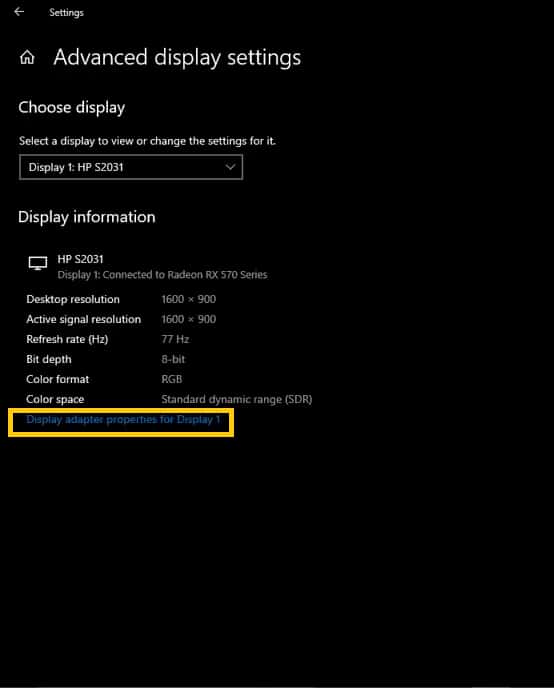
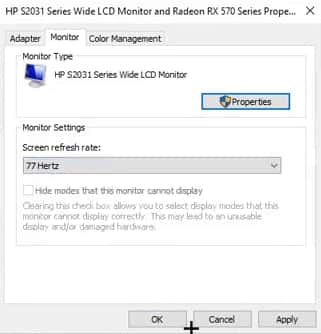
Step 5: Choose the Monitor tab and select the new refresh rate you created and click apply. Depending upon your monitor, it may or may not accept the overclock settings. The monitor remains stable if it accepts the overclock.
If not, your monitor may flicker and blackout. Don’t worry. It is a part of the process. The monitor will reboot to its old settings after 20 – 30 seconds. You can go back to the AMD Radeon Software and lower your custom refresh rate to a stable value.
The maximum refresh rate at which your screen doesn’t blackout and remains stable is the limit up to which you can overclock your monitor’s refresh rate.
You have successfully overclocked your Monitor using AMD Radeon Software.
How to Overclock Your Monitor: Intel Guide
Step 1: Right-click on the desktop and select “Intel Graphics Settings”.
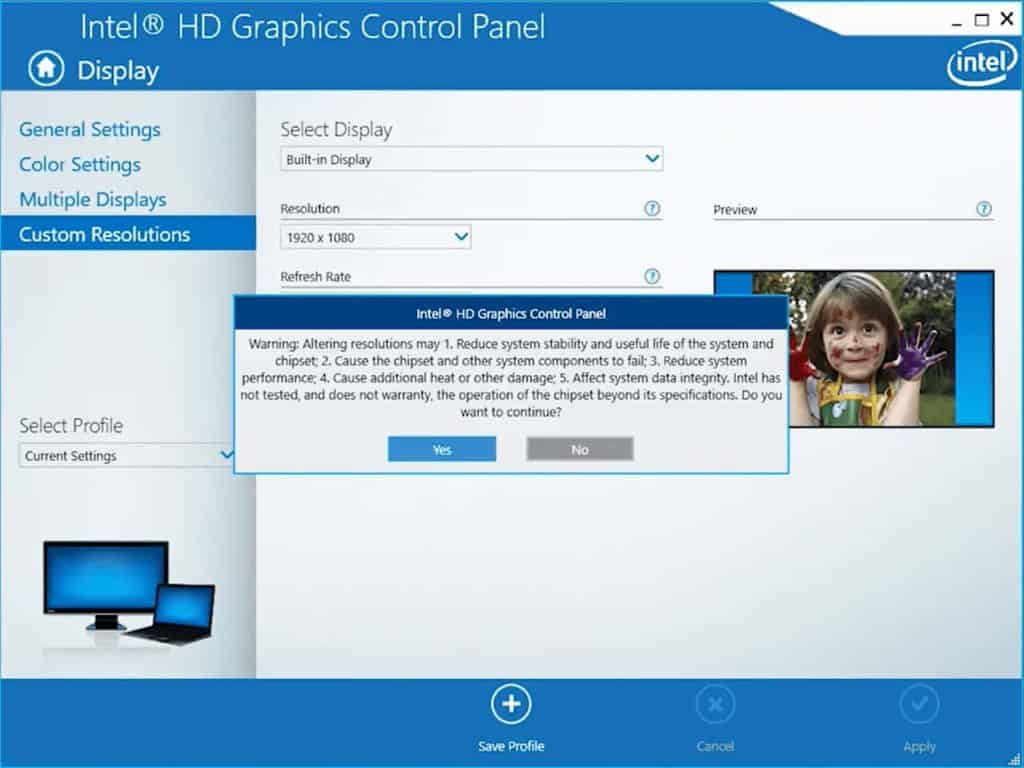
Step 2: Select “Display” and click on the “Custom Resolutions” tab. It will pop-up a Warning window. Read them and click on “Yes”.
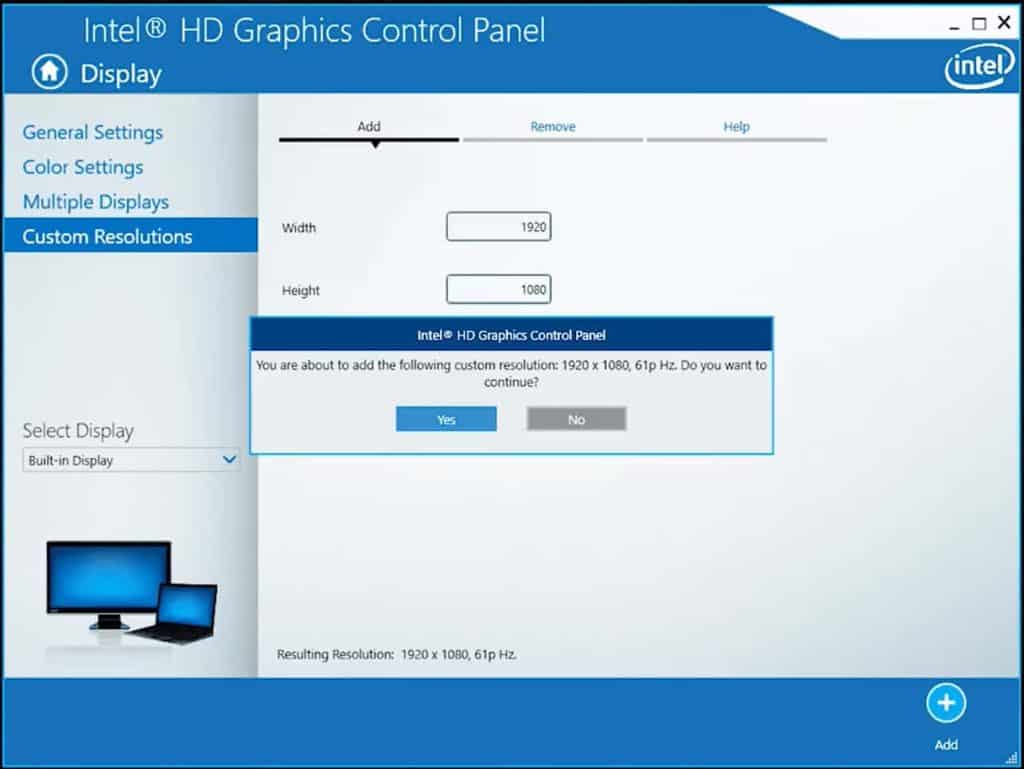
Step 3: Type the Width and Height of your monitor into their respective slots. In the place of refresh rate, increment it by 5 units and click on “Add” in the bottom right corner of the screen. Click on “Yes” on the pop-up window.
Step 4: Keep repeating these above steps until your screen flickers and blacks out. Once it blacks out, it will reboot itself to a stable refresh rate in 20 – 30 seconds. This is not something you need to worry about.
The maximum refresh rate at which your monitor remains stable is the limit up to which you can overclock your monitor.
In the case of laptops and older monitors, you may see a message saying “The custom resolution exceeds the maximum bandwidth capacity”. In such cases, you can use a software called CRU.
How to Overclock Your Monitor: Overclocking using CRU
Custom Resolution Utility (CRU) gives you full power over your monitor settings. This software works for both Nvidia and AMD GPUs and was used to increase the refresh rate before Nvidia and AMD incorporated the ability to change refresh rates into their respective software. The overclocking process is also fairly straight forward.
Step 1: You can get the CRU software by going to this site. Zip the files and put them in a folder.
Step 2: Right-click CRU.exe and run it as administrator. Choose the monitor and click “Add…” under the Detailed resolutions section. A pop-up window appears where you can tweak the different settings of your monitor.
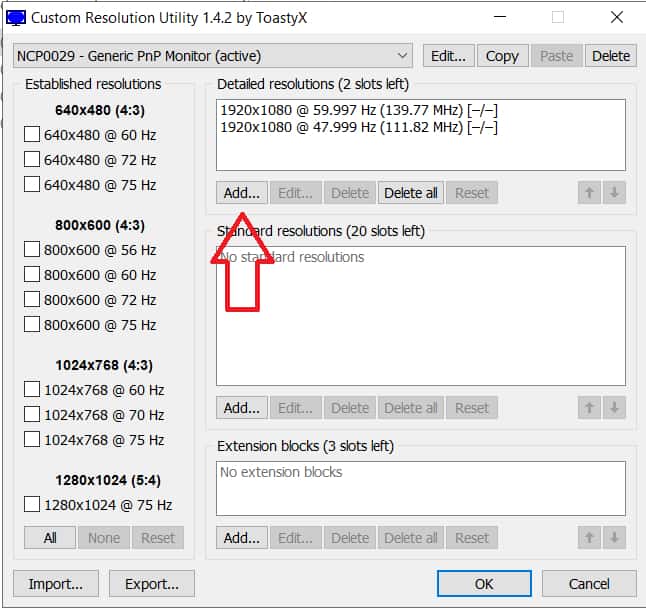
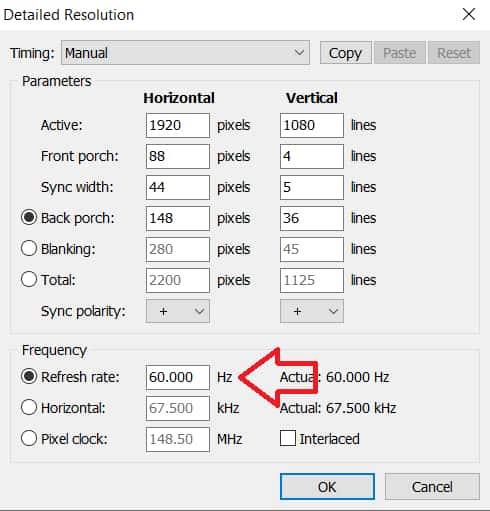
Step 3: Change the refresh rate by adding five units. Then press OK to save that refresh rate. Click OK again to exit the application.
Step 4: To finish the setup, run the restart64.exe file (restart.exe if you’re using a 32-bit Operating System). This will restart your graphics drivers and your screen would flash.
Step 5: To apply that higher refresh rate, you need to go to your PC’s display settings. Right-click on the desktop and choose the “Display settings” option. Click on “Advanced display settings” and click on “Display adapter properties”. A pop-up window appears.

Step 6: Under the “Monitor” tab, you’ll see the new refresh rates you created (If you did not see the refresh rates you created, try restarting the laptop). Just select it and click apply. If you do not see any screen artifacts or screen flashes, it means your monitor overclocked successfully.
If not, your monitor would blackout and reboot itself in 20 – 30 seconds. You should tone down the refresh rate until your monitor becomes stable without any screen flashes or issues.
You have successfully overclocked your Monitor using CRU Software.
Test for Frame Skipping to verify Monitor Overclock
We’re not done yet. Just because you overclocked your monitor to a higher refresh rate doesn’t mean it will actually capture all the frames in games.
Sometimes when you overclock your monitor, it may skip frames in games. This is called Frame Skipping. You can check if your monitor is skipping frames by doing the following
Step 1: Go to this website. Let the monitor sync up. Once the monitor is synched and is ready, you will see that the refresh rate of the monitor is your overclocked value.
Step 2: To test for frame skipping, you will need a digital camera. You can even use your smartphone’s camera. Screenshots won’t work. Set your camera’s exposure to 1/10th of a second or longer and take a photo of the monitor.
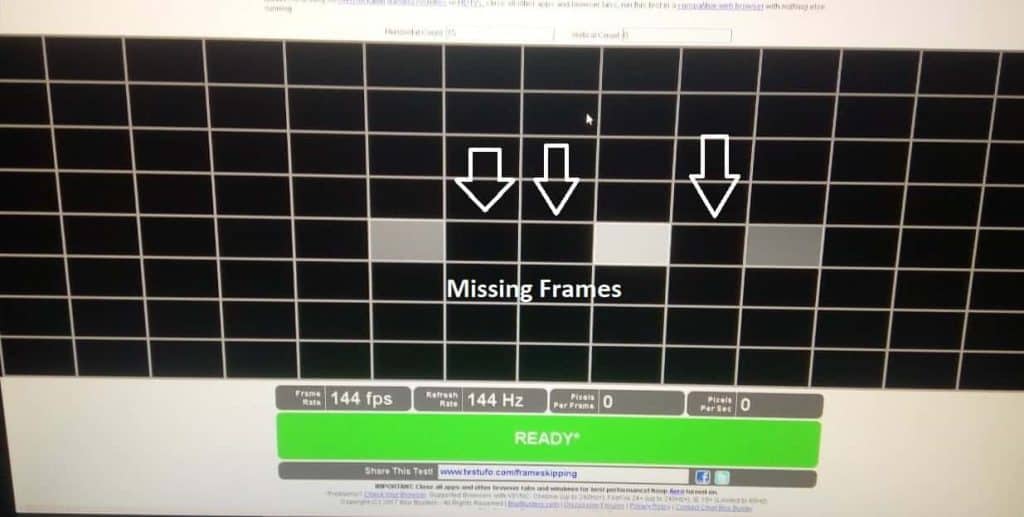
Step 3: The photo should have a sequence of multiple squares with no gaps in between them. If there are no gaps then your monitor is not skipping frames.
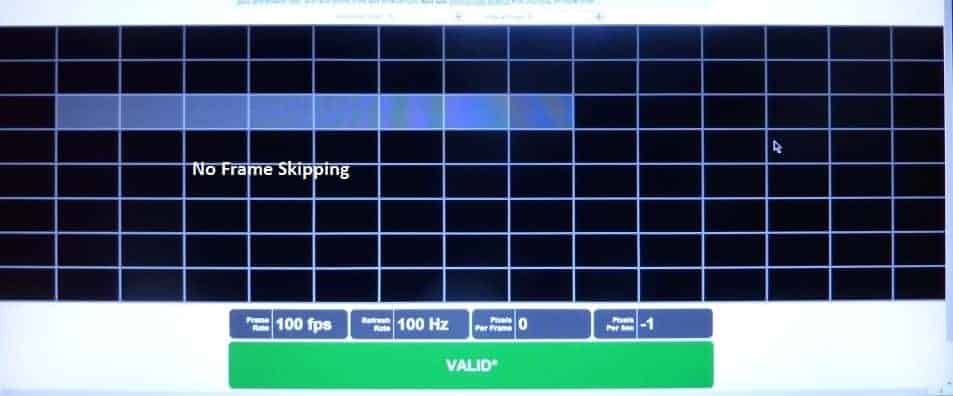
Step 4: If there are gaps, it means your monitor is skipping frames. All you need to do now is to lower your monitor’s overclock to a lower value and test until you see no skipped frames.
This is how you test your monitor for frame skipping
If there are any queries, drop them in the comments section below. We’ll get back to you ASAP.