MSI afterburner is a very popular overclocking software. It gives you a detailed overview of various hardware components of your PC. It can benchmark your performance, record gameplay, show FPS in-game, has multiple language support, enables custom fan profiles and also works for both any Nvidia and AMD cards. The best thing? All this for FREE. Yes! MSI Afterburner is free software. In this guide I will guide you to set up the software and teach you everything you need to know about it.
Downloading the software
- First, go to https://www.msi.com/page/afterburner and download the software
- In this tutorial I’ll be using Kombustor to benchmark and stress test the GPU to ensure stable overclocking. Now, go to https://geeks3d.com/furmark/kombustor/ and download the Kombustor software. You can use any benchmark software.
- Install both Kombustor and Afterburner. Also install the Riva Tuner that comes with the afterburner.
Before we do anything, Let’s set it up to suit our requirements.
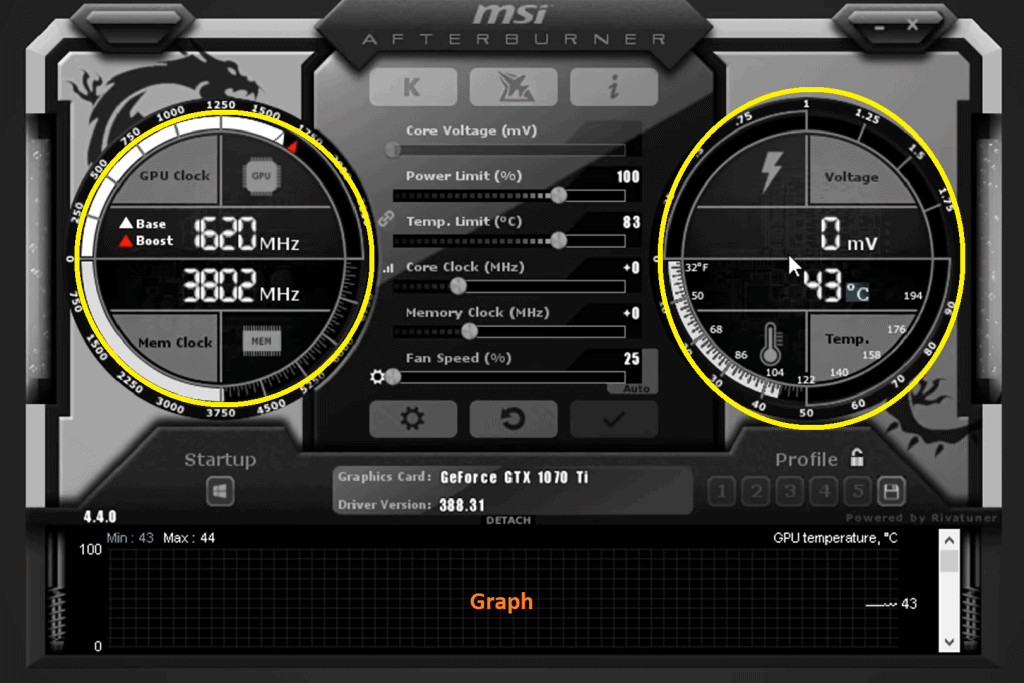
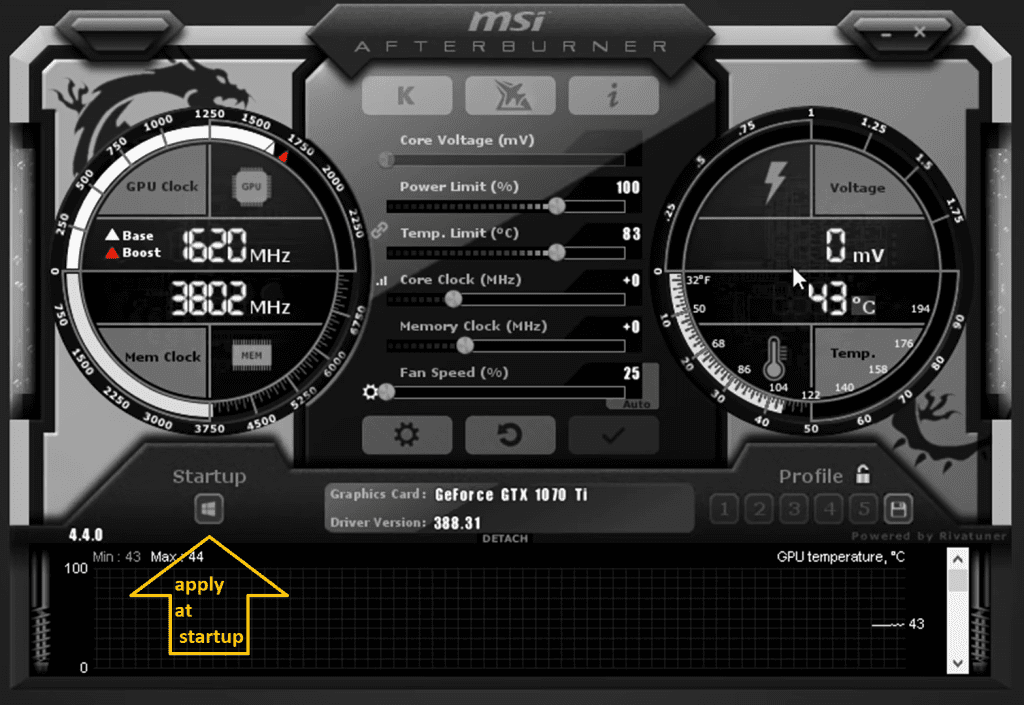
You can see the GPU clock on the left and side and underneath that is Memory clock. The GPU clock shows the speed of the cores of the GPU. The memory clock is the speed of the VRAM of the GPU. You can also see the voltage on the right-hand side and the temperature underneath it. The three buttons under fan speed scrollbar are Settings, reset and accept changes respectively. You can monitor various components like GPU temperature, RAM limit, CPU temperature, CPU clock in the graph section. To remove stuff you do not need, just right click on the graph and go to properties and untick components you do not want to monitor.
To set up the software
- Click settings and check start with windows and start minimized. This causes the afterburner to open in the background and apply the overclocked settings in the background for you automatically every time you start your computer.
- Enable Unlock voltage control and Unlock voltage monitoring. That’s it. The rest of the settings are up to you.
MSI Afterburner Interface
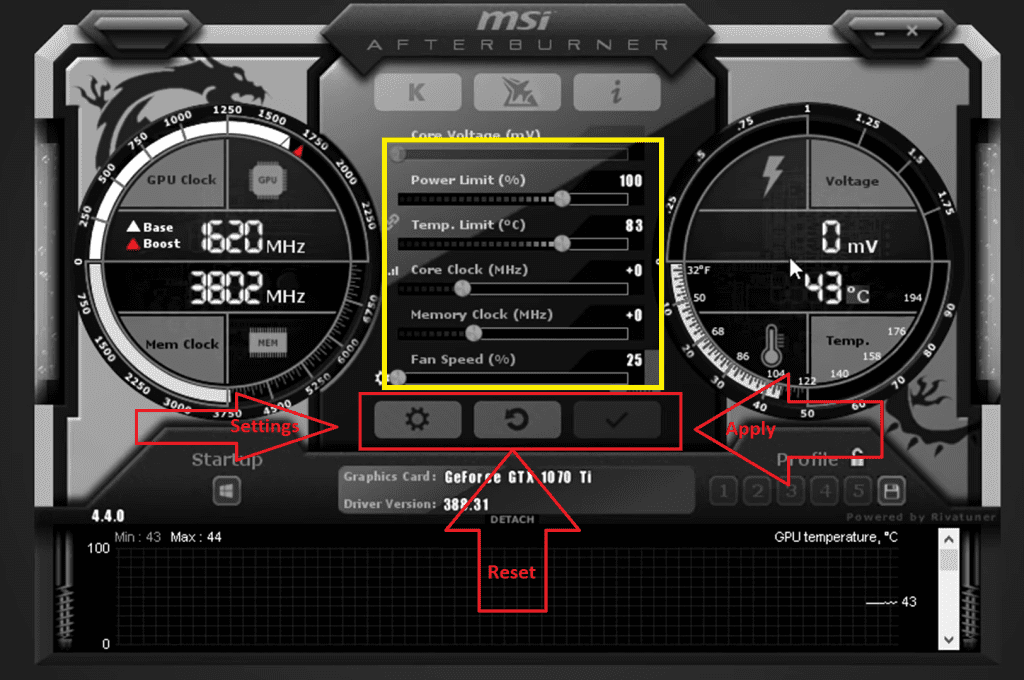
Core Voltage(mV): The core voltage adjusts your voltage in millivolts from the stock voltage of the card. Voltage gives you stability. The higher you raise it, the hotter your temperature becomes. However, the higher you raise it, the higher you can overclock your card. I don’t change the core voltage when I OC my GPU, I just leave it at the standard it came. I only change this when I want to go extreme OC.
Power Limit (%): your card has a set power that it is set to consume. This slider allows it to consume more power if it needs to achieve higher overclocks. Increasing the power limit increases the amount of power it can receive.
Temperature Limit(°C): This helps to regulate the temperature in which the GPU is running. Do not let the Temperature Limit exceed 85°C for a longer lifespan.
Core Clock (MHz): This is the speed of cores on the GPU. Increasing Core Clock boosts performance and hence adds extra FPS. This has more impact on gaming than the Memory Clock.
Memory Clock (MHz): This is the frequency of the VRAM of the GPU. Increasing Memory Clock is safer than increasing Core Clock. This has more impact on graphical applications like photoshop etc. This is mostly not affected by core voltage.
Fan Speed (%): When You overclock your GPU, it’s overall temperature increases. Increasing fan speed will help you to run the GPU at an optimal temperature. My suggestion to you is to increase the fan speed to maintain the temperatures below 85°C. Note than increasing fan speed increases the noise it generates.
NOTE: In the case of most laptops, Core Voltage(mV), Power Limit (%), Temperature limit(°C) and Fan Speed (%) cannot be manipulated. This is because few laptops have GPUs that cannot be overclocked (for example 940m). Laptop owners can use the below guide for overclocking.
Beginner’s Guide to Overclocking
For a beginner, I would suggest not to tweak Core Voltage and Power Limit. You should never touch your GPU’s core voltage unless you’re a seasoned pro. You can change your fan speed as you like depending upon how OK you are with the noise it generates. Here is the process I recommend for those who are new to overclocking and want to play the safe game:
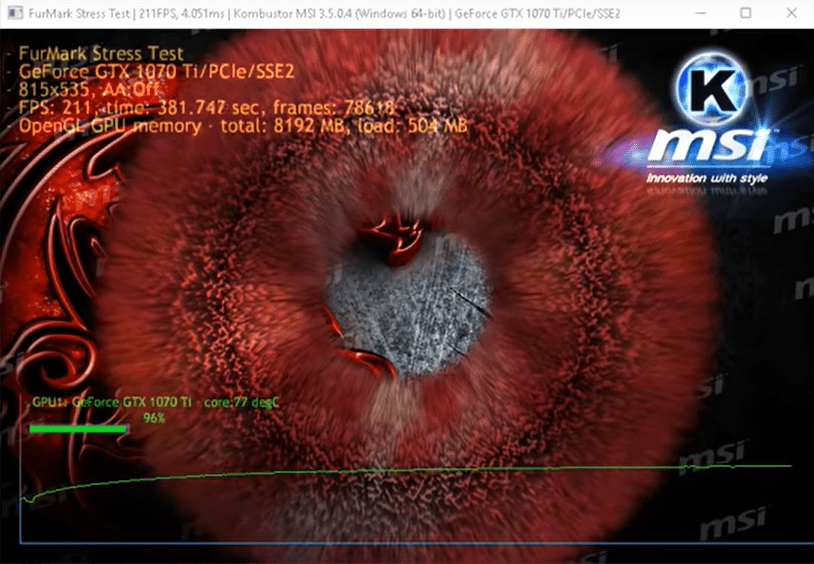
- GPU overclocking contains two parts first we overclock the core clock and then the memory clock so first increase the core clock by 25Mhz. You can use your mouse or left and right arrow keys for this. Now stress test it in FurMark mode in the Kombustor for 5 to 10 minutes.
- Keep an eye on the Kombustor window for any issues. These include any flickering, graphical issues, screen turning black, Kombustor crash and any driver crashes.
- If you do not experience any issues, increase the core clock by another 25Mhz and stress test it for 5 minutes. Keep repeating this process until you start having issues.
- If any of the issues start showing up. It means you have reached your max point of GPU overclock. Any further increase will crash your drivers. Nothing to be afraid of here. The drivers will reset themselves. This is a process to find your maximum GPU increase overclock point.
- If you start experiencing issues at a set core clock stop testing and re-apply your last stable clock setting. This will be the max point of your core clock.
- Repeat the same test for Memory clock. Increase it by 50Ghz and stress test it with FurMark for 5 minutes until you experience issues.
- When you start having issues re-apply the last stable clock settings. This will be the max point of your Memory clock.
- During the process adjust the fan speed so that the GPU temperature remains below 80(°C)
- Stress test the whole setting for 15 to 20 minutes. If you start experiencing issues decrease the core clock by 20MHz and restart the test. Your Core clock and Memory clock values should be somewhat as shown in the picture below but not exact because those values vary for each GPU
Note: If you notice any issues while you play games, just decrease the core clock by 10Mhz and memory clock by 25Mhz. This will usually do the trick.

How to Save Your Settings
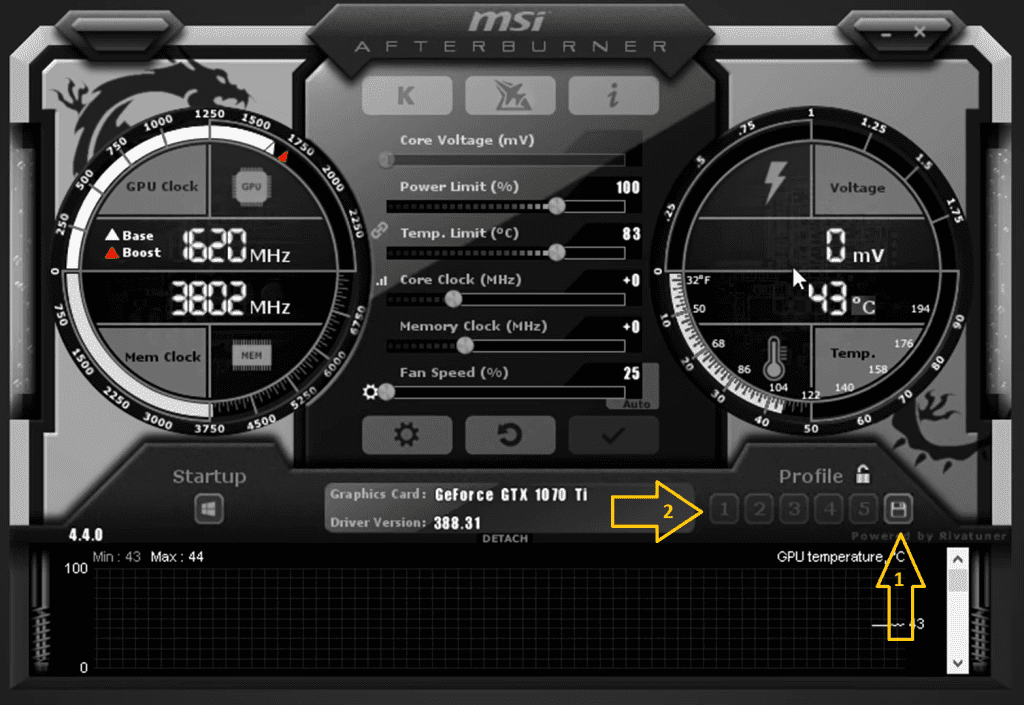
Press the save button under Profile and assign the configuration to the profile number of your choice. That’s it! Next time you open the afterburner, you can automatically choose this configuration by selecting the profile number you have just assigned.
Finally, click the apply at the windows startup button. This will enable the overclock automatically when you start up your system.
Advanced Guide to Overclocking
Enabling Custom Fan Control:
Most graphic cards have default and automatic controls for fan speed. This is to reduce noise. Overclocking generates heat and requires a good flow of air to keep GPUs working in optimal temperatures. Using default fan settings during overclocking will restrict the overclocking capability of the GPU. Hence it is essential to set up a custom fan curve. Here is how you do it:
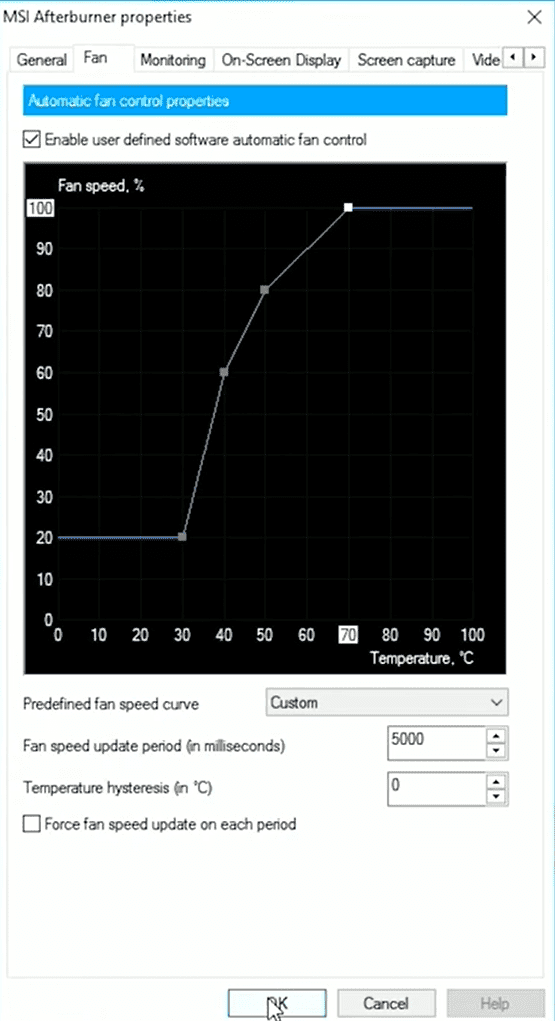
- First, Go to settings and under the “fan“ tab check the “Enable user-defined software automatic fan control” option.
- You’ll be provided with a graph with Fan speed and temperature and you’ll notice a few boxes which you can left-click and drag around.
- You can make new boxes by clicking anywhere on the line and dragging it. You can also delete a box by selecting a box and pressing the delete button.
- My recommended settings are shown in the below image.
- This basically means up to 30°C fan speed is 20%. when the temperature increases to 50°C, the fan speed is 60%. When the temperature is 60°C, the fan speed is 80% and finally when the temperature exceeds 80°C, the fan speed is 100% in usage.
- This is what I recommended. You can set it as per your needs
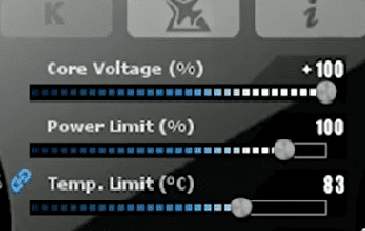
Next, we will be tweaking Core Voltage(mV) and Power Limit (%). Make sure your GPU has adequate cooling. DO NOT let your temperature exceed 90(°C) at any cost.
- First, Increase the value of Core voltage (%) to the maximum limit.
- Then increase the Temperature limit to 80(°C)
- You’ll notice the Power limit also increases.
- Now, start increasing the core clock speed by 25Ghz and run stress tests using Kombustor for 10 to 20 minutes.
- Keep on increasing the core clock until you see issues like screen flicker, screen blackout, Kombustor crashing, driver crashing, etc. Noting to be afraid of here. It is a part of the process.
- If you noticed any issues, stop stress testing and reapply the last stable core clock setting. This is your max point of core clock overclock
- Repeat the same process for Memory clock by increasing the memory clock speed by 50Ghz until you start having issues.
- When you start having issues, simply reapply your last stable memory clock settings. this will be the point of your maximum memory clock overclock.
- Run the stress test of this configuration for 20 to 30 minutes to see if it is stable. Your configuration will be somewhat similar to the below picture. It won’t be exact as it varies for every GPU.
- Finally, click on the save button and apply it to a profile of your choice
- You can also select the “Startup” button to apply this configuration on starting up your PC.
How to use the On-Screen Display (OSD)
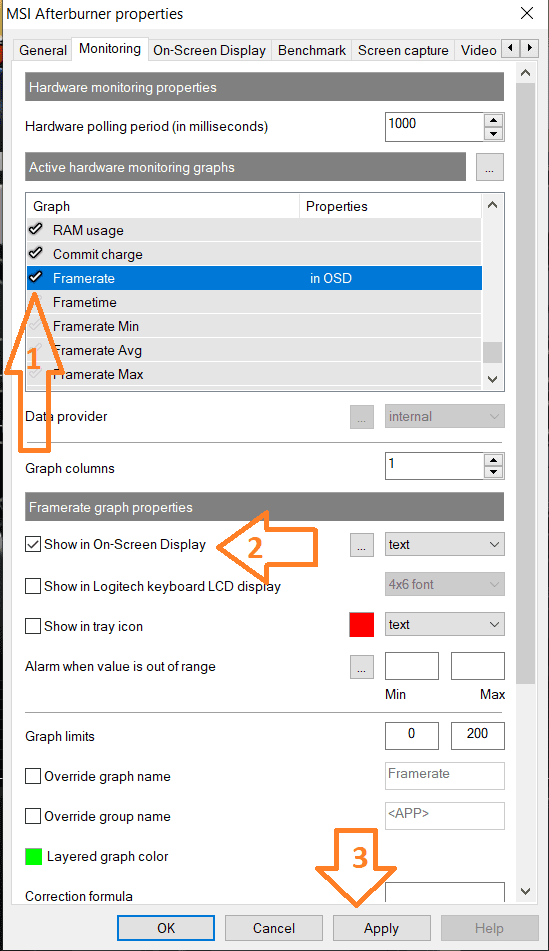
- In MSI Afterburner go to settings, then select the Monitoring tab and check the components you want to see on the OSD.
- Then select them all using the “Ctrl” key and check on the “Show in On-Screen Display” option.
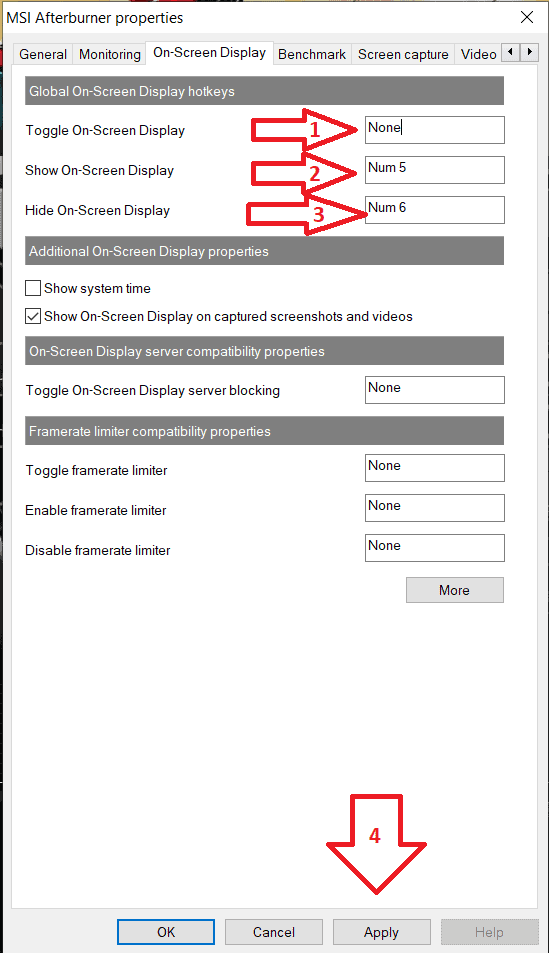
- Go to the On-Screen Display tab and type in the hotkeys to toggle the on-screen commands and click apply.
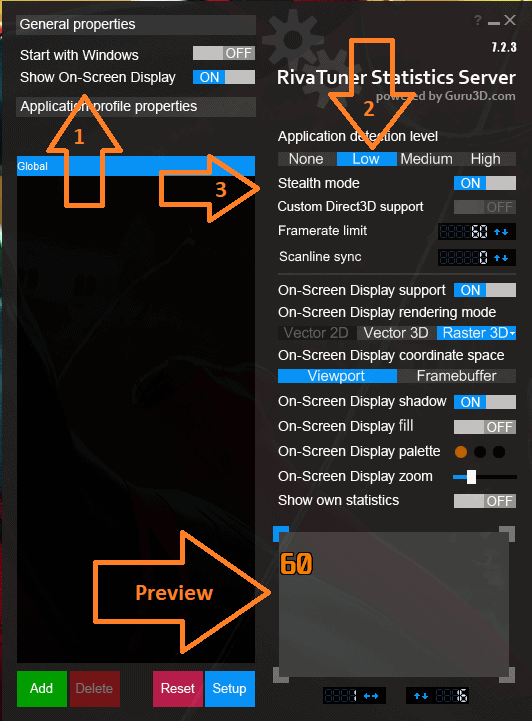
- Open the Riva Tuner and turn on the “Show On-Screen Display” option and click apply.
- Select the “Application detection level” to Low and turn on the “Stealth Mode”. Some games mistake Riva Tuner for modding software. By enabling the stealth mode, you will not have this problem.
- You can also change the position of the components by changing them in the preview. Just click it and drag it around until you are satisfied with the placement. (Click on the images below to enlarge them)
That’s it! Press these commands while in-game to toggle them.
Limiting FPS using MSI Afterburner
You can limit your FPS using Riva Tuner. Generally, using V-Sync can limit your FPS, but gives you an input lag. This is the reason we use MSI afterburner. Limiting FPS has many advantages:
- Smooth gaming experience
- Decreased heat produced.
- Decreased noise produced.
- Decreased energy consumption
- Increased Life span.
- Increased stability during multiplayer gaming.
Limiting FPS is especially beneficial to Laptops and Low-end gaming PCs. Here is how you do it:
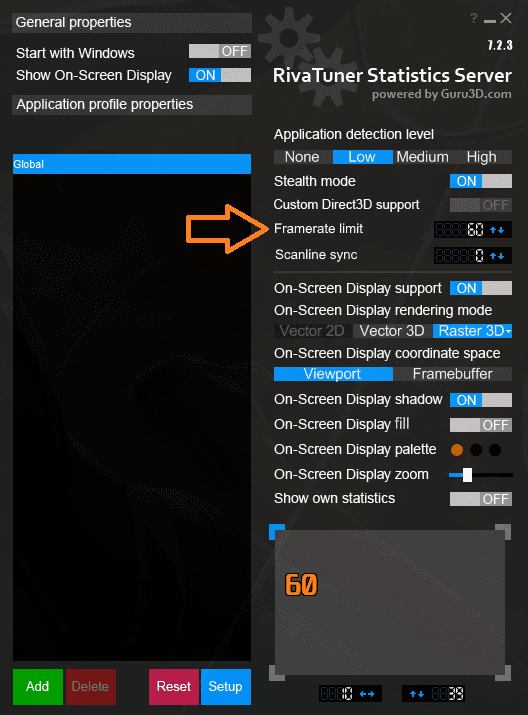
- Open Riva tuner and type an FPS value into Framerate limit
- You can disable the FPS limit by simply typing “0” into it. That’s it!
That is all you need to know about MSI afterburner. It can also record gameplay but I do not recommend it because of how complicated the setup is and also because the alternatives available are far better. If you want me to write an in-depth tutorial on Screen recording, just drop a comment and I’ll do it ASAP.
I have 3 GPU’s on the same MSI Afterburner. I am not able to set up 3 independent fan graphs.
I set the graph for the the first card and it applies itself to the other cards
What am I doing wrong
3090*1
1660S * 2
With thanks Richard Perth
Australia
There will be an option to select each GPU individually.
Select the one you want to change and try tweaking its fan curve…
Like this: https://i.imgur.com/QF36h8P.png